Projects
Raft from a waxed groundsheet
- Details
- Category: Completed
- Published on Sunday, 09 October 2011 14:10
Why build this stuff??
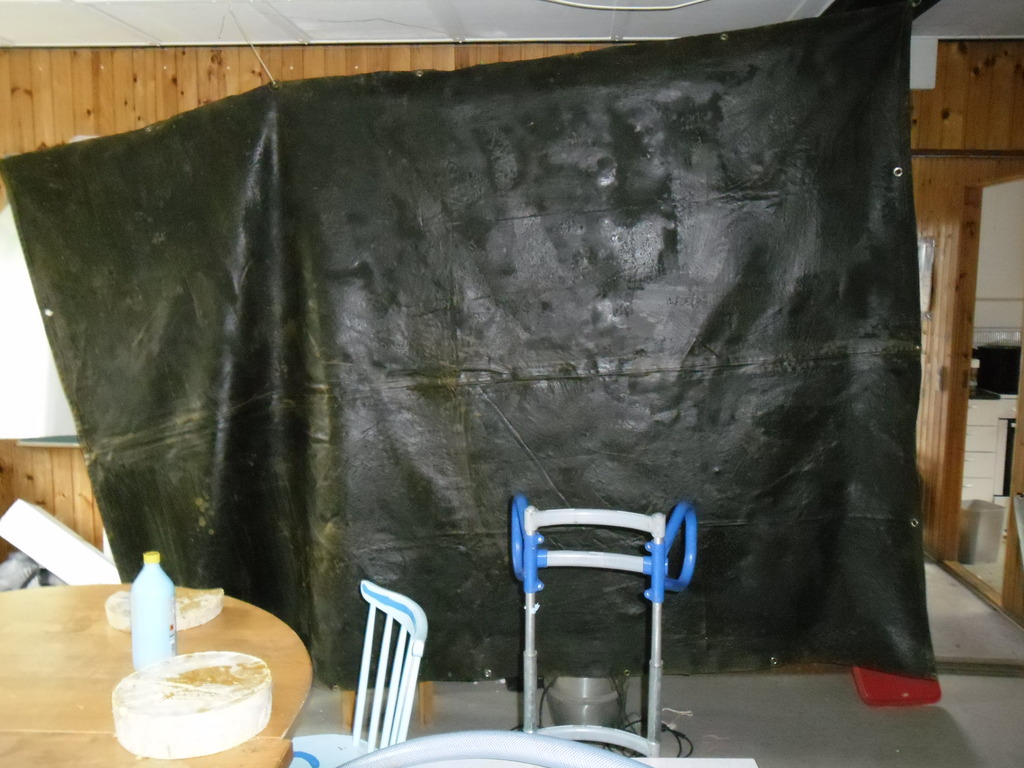
 Sailing merrily Sailing merrily |
Every year scouts from all over Denmark compete in building and sailing homemade rafts 10 km on the Mill River. The event is called "Mill River Rafting" (dk:Mølleåsejladsen), and scouts are supposed to build their raft in two hours.
They are only allowed to use a tarp, hand tools, rope and whatever they can find in the forrest. Normally scouts use factory made industrial grade tarps that is cut to a special shape. This, year (2011), however, it was Mill River's 50 year aniversory, so a few of us figured that we would compete in same fashion our grandparrents did back then.
Waterproofing a tent groundsheet using beewax
- Details
- Category: Completed
- Published on Sunday, 09 October 2011 11:31
Why waterproof a groundsheet this way?
 Waterproff groundsheet Waterproff groundsheet |
I and some other scouts have competed in the "MillRiver Race" (dk:Mølleåsejladsen) for so many years that we needed to try somethin new. The Mill River Race is a competition in which a scout should build his/hers own raft in two hours using only a tarp, some rope and whatever they can find in the forest. Thereafter they will sail the raft 10km to the finishing line.
These days, scouts use modern thick truck tarps that slide easily through the water, but as it was the events 50 year aniversory this year, we thought we would do something special. See, 50 years ago they did not have good plastic tarps and so used groundsheets for tents that had been waxed.
Therefore we set out to do the same.
Creating a 250v, 12V and 5V powerbox
- Details
- Category: Completed
- Published on Friday, 12 August 2011 15:42
What is a powerbox?
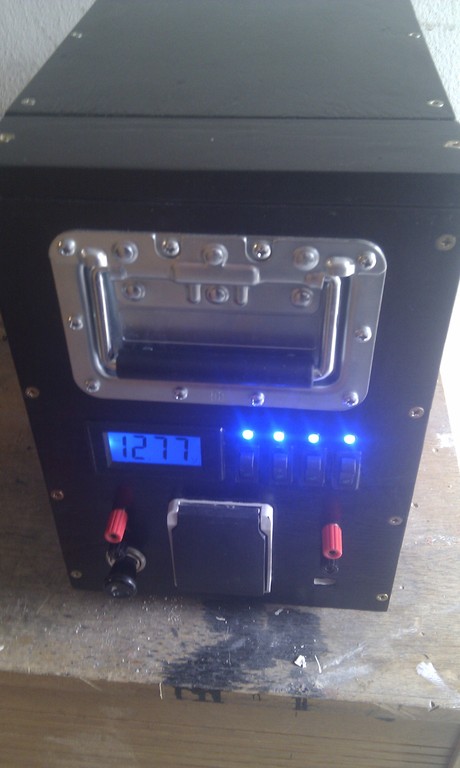 |
As a scout and a gadgeteer, I have for a long time wanted a portable powersupply. Often I need mains power to run some equipment or other in the middle of nowhere and have none. I do have a small 2 step generator, but is is fairly noisy and have too many powerspikes for finer electronics. In addition, my poor excuse for a workshop is in a place where i am not permitted to set up power, and it is often needed.
Therefore I decided to build a "powerbox". That is, a battery powered box that would provide both 250v, 12v and 5v.
Converting an old 8mm projector from bulb to LED
- Details
- Category: Completed
- Published on Friday, 12 August 2011 07:45
The Raynox DU 707 A projector
 Raynox DU 707 A Raynox DU 707 A |
I bought this lovely old Raynox DU 707 A projector a few years ago at a flea market. Along with it i purchased a box of old 8mm. cartoons.
What a catch. There was Popeye, Disney’s Cinderella, a bunch of Tom and Jerry movies along with lots of other lesser known cartoons. It took me several hours to figure out how it worked, and how to rewind the movies without them becoming upside-down or reversed. … but I figured everything out, and it has seen quite a lot of use since.
Unfortunately the (expensive) bulb died on me quickly and I decided to replace it with LED.
Restoring an old Arcade Machine
- Details
- Category: In Progress
- Published on Sunday, 28 June 2015 08:27
Computer and Software
Considerations
As mentioned, I wanted a to use a Raspberry Pi as the computer. I did, however, read reports that the Pi version B+ is only just fast enough to run late 90's games as Street Fighter, in fact it should be a little slow.
It might seem a little odd that the old games takes so much computer power, but remember that mame does not just play the game. It emulates the entire system, chips and all and therefore needs lots of power.
Therefore, I tested a few other options. I had a few thin clients lying around that should fit the bill. Among other options, I tried an VIA AMOS-3001, 2GB/1Ghz VIA Eden and a Nexceed 256Mb/1.6GHz Atom Nexterminal. Both does a pretty nice job, but neither has svhs or composite out, which my tv needs.
Though I could just get a converter, i ended up opting for at Quad core 900MHz/512Mb Arm 7 Raspberry Pi 2. Now, as of present, mame does not really lend itself well to multicore processing, but it does give a little - and more in some games - and I get the analog video out.
The current system only has 3 buttons, and most intensive fighting games has 4. Therefore I find that the Pi2 is a fair match. It does also seem to do well.
create a new user:
useradd -m mameuser
passwd mameuser
sudo usermod -a -G adm,dialout,cdrom,sudo,audio,video,plugdev,games,users,netdev,gpio,i2c,spi,input mameuser
make a mount directory
mkdir ~/usbdrv
sudo blkid
/dev/sda1 /home/mameuser/usbdrv vfat uid=mameuser,gid=mameuser,umask=0022,sync,auto,nosuid,rw,nouser 0 0
http://www.ducky-pond.com/posts/2013/Aug/install-an-ftp-server-on-rpi/
sudo apt-get install vsftpd
sudo nano /etc/vsftpd.conf
anonymous_enable=NO
local_enable=YES
write_enable=YES
local_umask=022
wget http://sheasilverman.com/rpi/raspbian/debs/advancemame-raspberrypi_1-1_armhf.deb
wget http://sheasilverman.com/rpi/raspbian/debs/advancemenu_2.6-1_armhf.deb
sudo dpkg --force-overwrite -i advancemame-raspberrypi_1-1_armhf.deb
sudo dpkg --force-overwrite -i advancemenu_2.6-1_armhf.deb
rm advancemame-raspberrypi_1-1_armhf.deb
rm advancemenu_2.6-1_armhf.deb
advmame
advmenu
remember to install and run mame first, as setupscripts for advmenu othervise may not fint correct paths.
your advmame.rc for your display:
- For HDMI try:
- device_video_clock 5 – 50 / 15.62 / 50 ; 5 – 50 / 15.73 / 60
- For NTSC TVs try:
- device_video_clock 5 – 50 / 15.73 / 60
finding mameversion:
http://advancemame.sourceforge.net/history.html
clrmamepro finds roms.
Set sound
sudo nano /etc/modprobe.d/alsa-base.conf
options snd-usb-audio index=0
options snd_bcm2835 index=1
aplay /usr/share/scratch/Media/Sounds/Vocals/Singer2.wav
type hw
card 0
}
pcm.usb
{
type hw
card "U012529205"
format S16_LE
}
pcm.!default {
type asym
playback.pcm
{
type plug
slave {
pcm "hw:0"
format S16_LE
}
}
capture.pcm
{
type plug
slave.pcm "usb"
}
}
check with
copy es_systems to local, which is checked before global settings
cp /etc/emulationstation/es_systems.cfg ~/.emulationstation/
http://computers.tutsplus.com/articles/using-a-usb-audio-device-with-a-raspberry-pi--mac-55876
https://www.raspberrypi.org/forums/viewtopic.php?f=29&t=108523&p=747147
http://plugable.com/2014/11/06/how-to-switch-to-usb-audio-on-raspberry-pi
Android tips
- Details
- Category: In Progress
- Published on Thursday, 20 November 2014 17:19
Just a few tricks for android that I have needed a few times :)
Installing android sdk and getting it to work
When ever installing android sdk on debian/ubuntu based systems, additional libraries must be added, as some parts of the 64bit package is actually using i386 calls. (adb for instance), All functions should work just adding the i386 architecture.aapt(which is a packing tool) does, however require azlib, which is dependend on the three last libraries.
sudo dpkg --add-architecture i386
sudo apt-get update
sudo apt-get install libncurses5:i386 libstdc++6:i386 zlib1g:i386
If this is not added, you will get a bunch of errors stating a lot of executables does not exist.
Finally installlibgl1-mesa-dev. This is an OpenGL library, and is needed to render some simulators (avd's) correctly.
sudo apt-get install libgl1-mesa-dev
In order to debug on the phone instead of the emulator, a Udev rule must be added, and the following text added in it
sudo /etc/udev/rules.d/51-android.rules
SUBSYSTEM=="usb", ATTR{idVendor}=="0bb4", MODE="0666"
SUBSYSTEM=="usb", ATTR{idVendor}=="18d1", MODE="0666"
after this run the following commands in order to reload udev rules
sudo udevadm control --reload-rules
sudo service udev restart
The vendorid is different for different makes of phones, and can be seen here: USB Vendor IDs. Note that your vendorid may change if you install a ROM. Mine used to be 0bb4 (HTC), but changed to 18d1. Hence the two lines in the udev rules. You can always perform a lsusb to check vendorid.
After this reboot the computer. You should be able to use adb devices
to check if the device works.
Buildserver visualizer
- Details
- Category: In Progress
- Published on Sunday, 02 February 2014 19:23
Installing operating system and configuring.
As the system would only perform very limited tasks, a very basic configuration would suffice. I would therefore like to install a barebone debian or ubuntu version.
I tried numerous time to install the newer debian and ubuntu versions, but all stalled. After half a day trying diffrent configurations, i found out that i
Installing the operating system on the SBC took some doing.
I wanted to run a tiny debian on it, so i tried to do a netinstallation of the LTS version 12.04. This did, however not work. I Installation started but threw a lot of errors and halted. After this, i tried ubuntu 12.04. This did not work either, but this time the installer told me that "PAE" was not supported... This is appearently a requirement for newer linux versions.
Linux tips
- Details
- Category: In Progress
- Published on Sunday, 12 January 2014 12:59
Just a small collection of linux/gnu tips. Primarily terminal commands for stuff you do on a regurely basis, but not often enough to really remember it.
Figuring out what is in Ubuntu installation tasks
When installing linux packages it is difficult to know which packages in installed with what tasks. For instance: What packages "Ubuntu Basic Server" contain?
if you run the command:tasksel --list-tasks
you will find that the "Basic Ubuntu Server" task is named "server".
If you run
tasksel --task-packages server
you will get a list of the packages in this task.
Check Linux version
lsb_release -a
Enable bash auto-completion
In order to enable the autocompletion, edit /etc/bash.bashrc
Uncomment the following section:
# enable bash completion in interactive shells#if [ -f /etc/bash_completion ]; then#. /etc/bash_completion#fi
Remember that all users must have executable rights to this file, otherwise it will only work for root. Also, the filepaths may be different for differnt distros.
Delete user
the -r switch removes the home directory, which would otherwise have to be removed manually
userdel -r username
Get a annoying Brother 7070dw printer working.
The problem is that brother does not officially support postscript on the cheaper printers. Also, their own drivers are not very good and requires loads of headaches. Luckily postscript is supported somewhat.
When installing the printer, setup as normal Brother printer, but select "Brother 7045N" in combination with the driver "Generic PCL 6/PCL XL Printer - CUPS+Gutenprint v5.2.10-pre2". This works ok.
Removing sound jitter from Intel Z97/H97 and ALC1150 audio chipsets in Ubuntu 14.04
If the sound is stuttering, it is because this specific chipset has not gotten setup definition in ubuntu 14.04. The workaround is to create a modprobe.d file with the required settings.
echo "options snd-hda-intel vid=8086 pid=8ca0 snoop=0" | sudo tee /etc/modprobe.
Get bluetooth working in Ubuntu LTS 14.04
Pair using normal means, In bluetooth manager, set as A2DP audio sink
thereafter add following to /etc/pulse/default.pa
.ifexists module-bluetooth-discover.so
load-module module-bluetooth-discover
.endif
This makes bluetooth available to the pulse audio manager. Restart with pulseaudio -k followed by pulseaudio -D Now go to "Configuration" in Volume Control (Pulse Audio Manager) and change the profile from your newly found bluetooth headset to "A2DP"
Backing up a website using lftp
Somethimes you need to backup a website. This site was, for instance, compromised through a fault in Joomla a few years ago. It took me ages to get it up as I did not have a backup.
There a loads of tools that can do this. Most notorious are wget and lftp. wget is very good at fetching websites. It is, however primarily made for websites, and that means that some of the switches that should make your life easier unfortunately only works in the webworld. Therefore, i generally prefer lftp, as it pretty much handles all protocols.
Sites can easily be backed up from bash using:lftp ftp://${remotehost} -u ${user},${password} -e "mirror --verbose ${remotedir} ${localbackupdir}
Create user, add homedir, grant access and add to sudoers
as root do:
useradd username -m (-m switch creates homedir)
passwd username
sudo adduser username sudo
Use Rsync to backup directories
normal rsync for backup looks like this:
rsync -c -r -t -p -o -g -v -l -s --progress --delete /mnt/Stuff/ /mnt/Stuff2
switches are:
-c skip based on checksum, not mod-time & size
-r recurse into directories
-t preserve modification times
-p preserve permissions
-o preserve owner (super-user only)
-g preserve group
-v increase verbosity
-l copy symlinks as symlinks
-s (protected-args) do not interprent special chars like $ and ~ in shell, but let rsync do it on remote host
--progress show progress during transfer
--delete delete files that are in dest dir but not in source dir
Note that the trailing / in paths means copy files IN this directory.
If it had not been there, the directory would be included.
This would result in copying to /mnt/Stuff2/Stuff
Trailing slashes are ignored in destination folder.
Java
To install java jdk using apt-get:
sudo apt-get install openjdk-7-jdk
If Oracle JDK is needed:
sudo apt-get install oracle-java7-installer
Manage default java version:
sudo update-alternatives --config java
Can also be done for javac:
sudo update-alternatives --config javac
Setting JAVA_HOME environment variable.
- Get path to java:
sudo update-alternatives --config javac - Edit /etc/environment:
sudo nano /etc/environment - Add Line:
JAVA_HOME="YOUR_PATH" - Save and afterwards reload environment variables using:
source /etc/environment - Test by running:
echo $JAVA_HOME
Mono Developer
to install mono along with mono developer from repositories, use:
sudo apt-get install mono-mcs libgtk2.0-cil libgtksourceview2-2.0-cil monodevelop monodoc-base mono-tools-gui mono-complete
Ubuntu 14.04 on macbook air '11 (2013)
When installing, it becomes clear that the WiFi does not function perfectly. Mine could list the networks, but not connect to them. This is a but that had been corected for my NIC (Broadwell BCM43224 808.11a/b/g/n rev 0.1) ... check you have the same NIC before trying (write lspci -nn |grep 0280 .. if your pci.id is 14e4:4353 you have the same NIC)
This was corrected by connecting to a nonencrypted wifi over my phone and running
apt-get update
apt-get install linux-headers-generic
apt-get install --reinstall bcmwl-kernel-source
modprobe wl
... kind of a chicken or egg thing.. could not get the new config for the nic because there was no connection to the nic...
Android tips
When ever installing android sdk on debian/ubuntu based systems, additional libraries must be added, as some parts of the 64bit package is actually using i386 calls. (adb for instance), All functions should work just adding the i386 architecture.aapt(which is a packing tool) does, however require azlib, which is dependend on the three last libraries.
sudo dpkg --add-architecture i386
sudo apt-get update
sudo apt-get install libncurses5:i386 libstdc++6:i386 zlib1g:i386
If this is not added, you will get a bunch of errors stating a lot of executables does not exist.
Finally installlibgl1-mesa-dev. This is an OpenGL library, and is needed to render some simulators (avd's) correctly.
sudo apt-get install libgl1-mesa-dev
In order to debug on the phone instead of the emulator, a Udev rule must be added, and the following text added in it
sudo /etc/udev/rules.d/51-android.rules
SUBSYSTEM=="usb", ATTR{idVendor}=="0bb4", MODE="0666"
SUBSYSTEM=="usb", ATTR{idVendor}=="18d1", MODE="0666"
after this run the following commands in order to reload udev rules
sudo udevadm control --reload-rules
sudo service udev restart
The vendorid is different for different makes of phones, and can be seen here: USB Vendor IDs. Note that your vendorid may change if you install a ROM. Mine used to be 0bb4 (HTC), but changed to 18d1. Hence the two lines in the udev rules. You can always perform a lsusb to check vendorid.
After this reboot the computer. You should be able to use adb devices
to check if the device works.
Building an USB powerwall
- Details
- Category: In Progress
- Published on Saturday, 28 December 2013 10:00
http://blog.curioussystem.com/2010/08/the-dirty-truth-about-usb-device-charging/
uses voltage division. resistors ordered from china.
http://www.instructables.com/id/yet-another-iPhone-charger/
http://timothyb.net/DIY_iPad_2_USB_Charger.html
| Apple charge configurations | ||
| D+ | D- | Power |
| 2.0V | 2.0V | 500 mA |
| 2.0 | 2.8 | 1000 mA |
| 2.8 | 2.0 | 2000 mA |
Making a printer and scanner server
- Details
- Category: In Progress
- Published on Sunday, 13 May 2012 19:34
Making a printer and scanner server
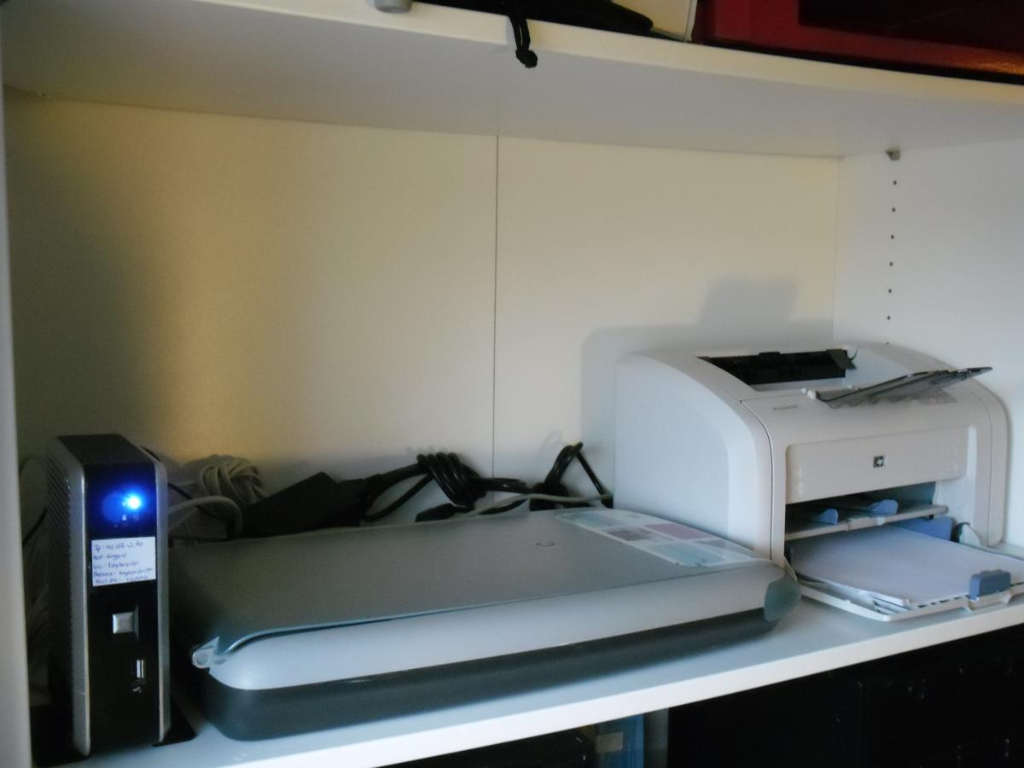 Shared scanner and printer setup Shared scanner and printer setup |
Setting up a small print-and-scanner server is fairly straight forward if you know your linux, but might give you a few problems otherwise. I have for some time wanted to be able to both print and scan from different computers and therefore wanted to build a server capable of handeling both.